Panels on a flat roof

Hi all
From the little reading I did on this a while ago, it seams the panels must still be tilted a couple of degrees for water run off / self cleaning and I presume they should anyway be lifted from the roof a bit for some airflow.

If I remember some articles even suggested that panels on a flat roof isn’t really a disadvantage over panels on a tilted roof as many might think and that it can work just as well.

Is panels on a flat roof suggested or should another plan be made, big advantages / disadvantages?

You want to tilt them to about 30degrees depending on where you are. But putting them on a flat roof without and tilt towards the sun will mean the best you will even get out of them is 70% of their spec. If that is fine with you, then you can keep them flat. :slight_smile:

Yes, panels should be tilted 5 degrees minimum for rain cleaning. (At least that is the figure I see quoted).
I think 100mm to 150mm is probably in the right zone for a gap to the roof. (Again, that’s what I have seen quoted and that’s what I did).
A disadvantage is that it would favour summer production and never be optimum. ( although a 5-degree tilt would probably be optimum at the summer solstice for a lot of ZA).
An advantage is a flat panel is a lot more productive on an overcast day over an optimally tilted panel. (I can’t remember the exact figure, but I did post an article about this on this forum).
Another advantage of a flat panel is a longer solar day. Believe it or not, the sun actually rises and sets behind an optimally tilted panel in summer.
I learned that you work with the roof you’ve got, fancy frames cost money and are less stable and don’t look as good. They also cast longer shadows, so I just use more panels to compensate and I am better off on overcast days.
When I removed my (homemade) frames I found multiple welds had failed. This never caused an issue as I was removing the frames anyway, but they would have failed catastrophically in the near future.

2 Likes

As the others have said :slight_smile: You want some airflow below them. Directly on the roof is too hot and not only will they make less power, they will degrade faster. 100mm to 150mm is a good space.

If you do that, you should look at the Renusol flat-roof systems. They have a rail system that allows you to do an east/west type setup with a 10° tilt. Or you could also just fit triangles on their MS system with a low angle.

3 Likes

This is the key, as long as you don’t face south put as many panels as you can fit/afford and put them in strings facing same directions. Slightly tilted will help get rid of dust which I have tons of.

From data I’ve seen in the past, Gauteng actually has a crazy number of overcast days in summer.

If talking more panels to compensate, how many more would you say if working on the basis of a system with a 5 kVA Multi, 6 kW, 8 kW, more?

Also would you put east and west on 2 separate MPPT’s or won’t it really matter since all panels is anyway very flat?

From what I have noticed on my system is that when overcast I get about 10% of panel production but it can go to almost nothing if it’s stormy and very dark. Luckily in Gauteng it usually rains and then clears up, sometimes it rains for a week or two but that isn’t the norm.

For example this morning it was miserable and drizzling and I was getting 800W out of my 7kw array but then sun cleared and by 10:30 I was getting 4,5kw.

What I learned and from now on what I will always do.

  1. Buy panels by the pallet, it’s cheaper per unit and you are not trying to find matching panels in 6 months. Buy more than you need now.
  2. Decide on a standard string length that is just below your MPPT’s voltage threshold.
    ( 2, 3 or 4 panels/string depending on your MPPT’s)
  3. Install panels, and parallel nearby standard strings into arrays using 6mm cables and MC4 connectors.
    This paralleled array should be such that the combined Imp of the array is just under 30A.
    ( Say 3 or maybe 4 strings/array)
    Now bring the 6mm cables from each array down to a ground-level DB and parallel these arrays marshalled at the incoming side of your DC MCB’s. To be clear, there should be one MCB for each MPPT input, not one MCB/array.
  4. Hook everything up so that the paralleled arrays theoretically max out the MPPT’s current input.
  5. Now we get to the important bit. Wait until noon on a nice sunny day when you are charging the batteries full tilt. ( Around the summer solstice for flat panels). Measure the current contribution from each 6mm cable pair.
  6. Now mix and match your 6mm cable pairs to really max out 1 of your MPPTs current inputs by combining East and West arrays on one DC MCB.
  7. Note how much current headroom you have on the now underutilized second MPPT.
  8. Install more panels, intelligently estimating what the real contribution for East and West arrays are to max out the second MPPT.

MPPT’s are sized to cater for peak current. So the idea is not to exaggerate that peak, to be able to have more panels on an MPPT. It may not be much different because the panels are flat, but I would still make an initial theoretical estimation and then optimise it by real-life measurements. This probably means combining E and W panels on an MPPT.

In my own case, I could fit 60% more panels without my MPPT’s clipping than the theoretical maximum. I have talked someone else through this exercise as well and they also had 60% practical headroom over the theoretical. Every case will be different, but I think 60% may be as good a guess as any.

2 Likes

You can usually oversize by 20% without any problems at all. So that gives you a range of somewhere between 20% and 60% oversize. Just make sure you keep your current below the maximum of the MPPT (PV side).

1 Like

Just to confirm do you mean Current of Voltage? Voltage I know has to be below. But current will be clamped, not so?

1 Like

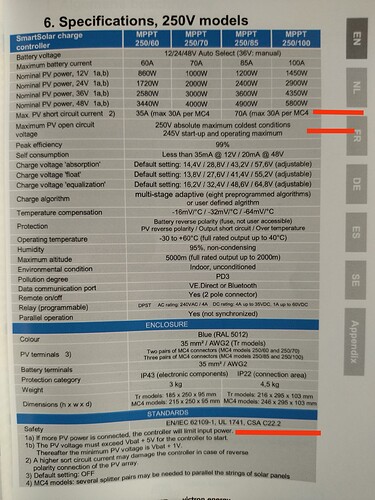
So if you look at pic below, the first two red lines are very important, you must see how many panels in series and parallel will be below those two figures.

The last red line shows that whatever you exceed gets clipped but in real life you hardly ever get full output so you can put much more panels with a theoretical higher wattage than what the mppt can handle but realistically you will hardly ever reach

See my pic point 2 at the bottom

Output current will be clipped. The idea is to load up the MPPT so that the highest peak output current will be very minimally and very occasionally clipped.
By virtue of this being a power transfer device remember that the PV side is the higher voltage and the lower current side.
So by optimizing the MPPT’s output current at the highest safe PV voltage, the PV current input limitation is not likely to be breached either.
So I wouldn’t factor it in as a design issue, just do a measurement after the fact to check.

Yes. But… there are limits. Let me explain quickly. The MPPT behaves a bit like a DC “transformer”. So it swaps volts for amps so that the overall power is more or less the same (within 95% usually).

So if you start with 200V at 5A, 100V at 10A, or 60V at 16A, and all of those would give you 20A on the battery side, if the battery happens to be at 50V.

But… the FET(s) inside the buck converter that makes up that MPPT has a limit, and you need to stay under that. For example, consider the 250/70:

So while it will clip at 3500W (50V times 70A), it would be unwise to wire your PV in 2-series multiple-parallel strings, because then you’ll run at 100V, which means that at 3500W you are right on the 35A limit.

Now with Victron MPPTs, it is actually fairly hard do mess this up, since they have fairly high limits as long as you are not a complete idiot.

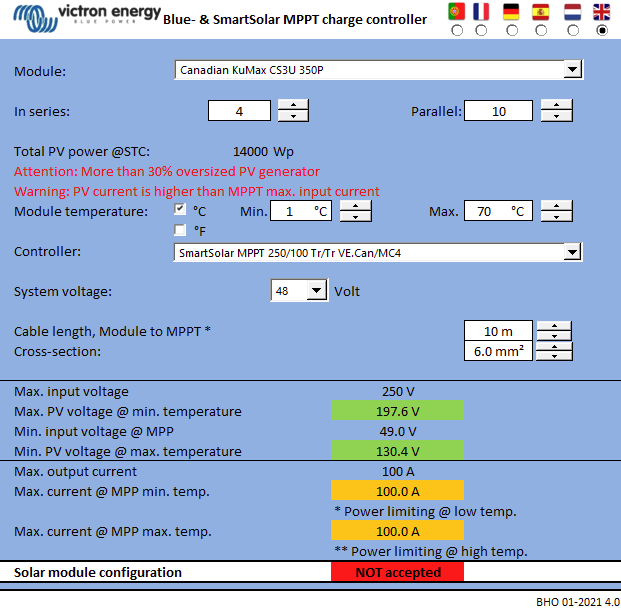
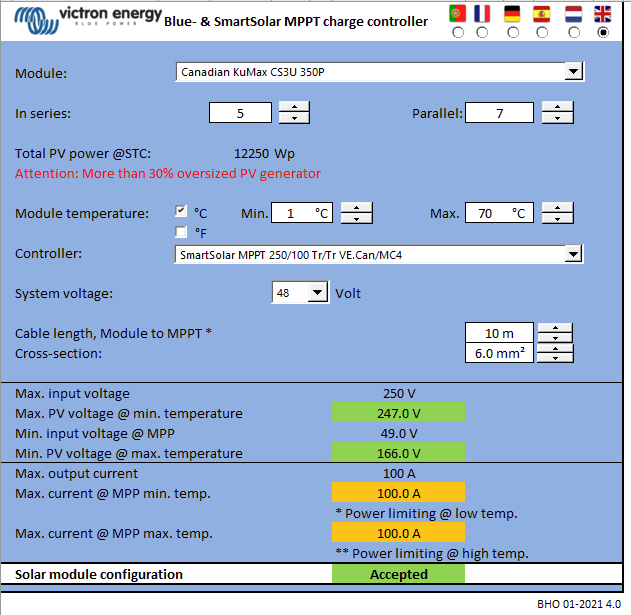
But my point is that you must be careful, if you oversize by 60%, that you don’t end up exceeding this value. For the 250/70 model in this example, you want to run right around 200V, so 4-series, 3 parallel most likely. Assuming 400W modules (to make the math easy), that is 4800W total that will be safely clamped at 3500W (ish), getting you a maximum of around 4800/3500 = 1.37, or 35% oversizing.

For other hardware, the limits might be worse. Some Goodwes for example have an 11A input limit, so a single string is the max you can connect to it, and you can oversize only until you hit the max voltage, then it’s over. Some other popular inverters have a limit of 22A, which pretty much limits you to two strings.

2 Likes

One day when I’m all grown up … till this past Cpt winter. :man_facepalming:

If I continue that line of thought for the 250/100, then you have a theoretical max input of 200V at 70A (14kWp), with a maximum output of 50*100, or 5kW. That would allow for over 200% oversizing.

The amount by which you can oversize may be limited by the MPPT you choose. That’s probably where I’m trying to end up with this argument… :slight_smile:

2 Likes

Am following your i.e. 200v max 70amps … big goons needed … :wink:

I think my point is being missed here. I am not advocating massive over-paneling and consequently massive output clipping (or clamping) based on a whim.
I advocate that you increase your panel numbers until the MPPT barely clips.
And if you do that, that in turn will ensure that you won’t be in danger of breaching the current input limits.
The reason for doing this is that theory and practice is quite different. So start with the theory, then measure and install more panels to optimise.

Took me 1 year to see how much more panels I needed, between summer too much and winter too little … and then this winter came, no matter how much panels I had up, input would have been Zero.

So my 2 cents, take it over 1 year with the data you gathered.

2 Likes

I your panels are at many different tilts this is sound advice.
On the other hand, if the majority of your panel are a specific tilt, you can pretty much determine which month is going to be the most productive.
Generally, if you tilt to your latitude angle it’ll be around the equinoxes.
23 degrees flatter than your latitude and it will be optimized around the Summer solstice, and 23 degrees steeper it is optimized at the Winter solstice.
If you know your roof pitch, you can use websites like suncalc.org to pretty nail it to a specific day to take your measurements.