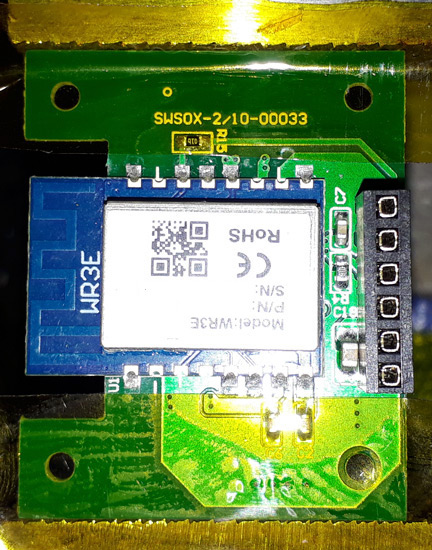
After loosing my CBI astute values again on HA i decided this weekend I will flash them with Tasmota and looked up all the info I could find. Opened one of the 7 I am using and realized with a shock that they don’t come with the ESP-8622 chip anymore. After some more reading it became clear that Tuya did not like the the idea of there equipment been flashed with 3rd party software. First they released new software twice to stop people from flashing their hardware, but when they saw that some guys on Github kept on finding workarounds, Tuya developed their own Wifi module called the WR3E. All the new hardware comes with the new chip and cant be flashed imo.
The guys on Github also states that they can no longer help and that only the old CBI’s can still be flashed. This rules the CBI Astude out as a suitable option for use with HA. To keep the data live I have to use their Cloud service and periodically need to refresh some code in the cloud instance for security reasons (They Claim).
I want to totally get away from the cloud based app so i someone knows of a workaround, please share the details.
Note: As I was looking for the Ip’s of all the Tuya devices I saw many many devices connected to my network that I could not identify, so the whole of yesterday ended up in a attempt to identify all the IP’s. Had to rename all the PC’s. Laptops, Phones, Server, IOT devices, Router, AP’s, TV, Printers, Voip phones, Aquarium lights, Alarm, Cameras, Raspi.s and and and. I then decided to group devices into specific IP ranges and name all of them on my router. To insure it stays that way I matched static IP’s to Mac addresses. After getting all the mac’s I started setting up the static IP’s one by one, removing the device from the network one by one, bringing it back online to get his assigned IP and opening up his previous assignment for other devices. At 9 last night after spending the whole day identifying devices and mac’s I was 2/3 through assigning static IP’s when I saw that the stupid router Afrihost has given me can only have 32 static IP’s. Cant assign more. So today I will start over and only assign statics to HA devices and equipment that I cant assign static IP’s to on the device itself. For the rest i will set up static IP’s from the device site. I have over 50 permanent devices with another 8 devices only being on site some times, but I need to label all of them to have better control of my network
I even saw ESP devices on my network and I have not used ESP devices in this house. Took me hours to find the three devices. My alarm panels uses a ESP 32 to connect to the network, so does the 2 Horizon Aqua lights I use in my aquariums. Those three devices really took a long long time to identify.
Finding devices can be hard. On my network there was a device that had no decent name. The hardware address indicated it was made by Motorola. I have no such devices that I am aware of. Turns out it is a BlackView tablet with Motorola network hardware. What is even more interesting, is we have two of those Blackview tablets, and the other one is not a Motorola
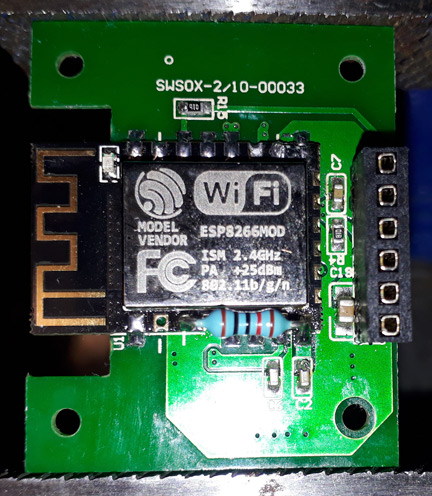
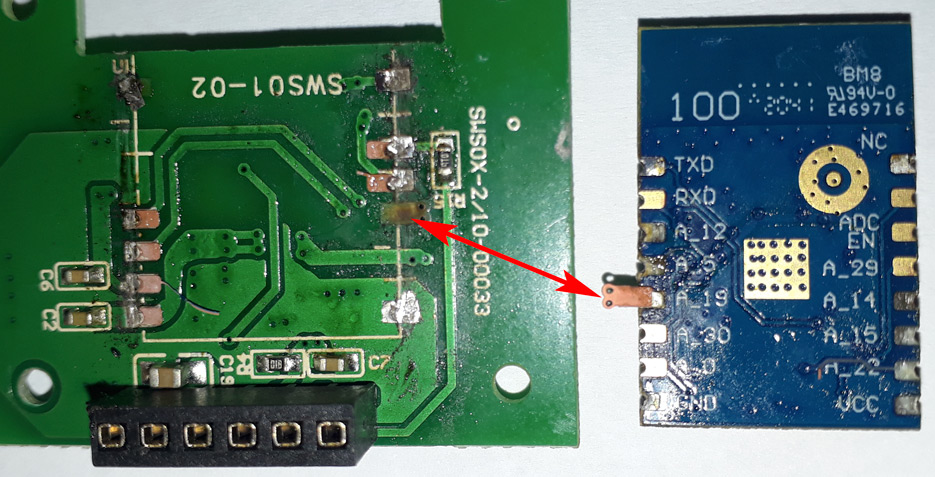
if you feel like playing with your soldering iron you should be able to replace the WR3E with an ESP-12F if you want Tasmota. (now seemingly inactive member @gbyleveldt did the hard work and posted the instructions on MyBB). Even I managed to do this with an Astute Isolator (although I did cheat and use a cheapish Adendorff soldering station with a hot air gun).
use some Kapton tape to mask off the surface mount capacitors and resistors near the chip when desoldering - should help prevent going from “hey look at me, I desoldered a chip like some hollywood bomb tech”…to couple of seconds later… “oh F#%&! [poop] … what is that tiny shiny rectangle and where does it go???”
I also sommer used a bench vice to lightly hold the PCB since I have not yet evolved to have more than two hands.
If new to desoldering - grab any old PCB that is no longer needed and practice on that - don’t be too hasty… my first attempt I tried the soldering iron and oodles of solder everywhere method but struggled to get even heat distribution and ended up pulling a pad of the PCB . Rather buy/borrow/steal a hot air station…
Remember to do the power calibration once the chip is replaced and flashed.
ESP-12 on board (the 0805 SMD resistor soldering is very fiddely and my solder joints will make @Richard_Mackay and @_a_a_a cry but it still works).
Oh yes, if not feeling like especially the smd soldering there is apparently an ESP-12 (12S) varaint with the pins already pulled high/low - see further in the mybb thread - and three posts down. The 12S is however not that easy to find locally
You can work on SM devices with a soldering iron but do yourself a favour and get a Oryx solder sucker. ORYX SR3AS-AS - Communica [Part No: ORYX SR3AS-AS]
This will allow you to remove solder from each pin, one at a time so you can remove the device. Solder wick can then be used to clean the pads…
By the time you guys posted this, I had already ordered the other one. Will play a bit this weekend. Use to do a lot of soldering years ago, but like all other skills, if you dont use them often, you loose them. Have a lot of old PC bords lying around, ill start practicing tonight.
with my very limited experience I found a de-solder sucker (granted not an “Oryx”) very useful on through-hole components but on the surface mount package with multiple joints on multiple sides I could not get it to work - solder remained underneath/between the two adjoining surfaces of the component and PCB pad. A hot air station made it much easier.
first attempt with solder iron and de-solder sucker (and impatience) resulted in this
Even on through-hole stuff, I find that a solder sucker leaves just enough lead behind that the device does not come out cleanly. It still takes a bit of heat and wiggling to get it out. Maybe I just have a bad sucker. I find that soldering wick works better. But for surface mount, the answer is a hot air gun. I will get myself one some day.
Cant believe the service from DIY electronics in Durban. Ordered at 12Noon yesterday and is was delivered at 10am today. I thought it must have been shipped from a JHB branch but the package clearly showed it was collected from DBN.
Hi Eben, from what i could gather, when they started off, you could choose from a veriaty of chips, including the ESP8266. I will leave the Github link below as well as two paragraphs from this article. I think I have one with an ESP chip but need to remove it from operation to see for sure.
I will convert my spare unit and then replace one and remove the next till I am done.
A Chinese company named Tuya offers a free-to-brand turnkey smart home solution to anyone. Using their offer is dead-simple, since everything can be done by clicking through the Tuya web page, from choosing your pre-designed products or pre-programmed wifi-modules (mostly ESP8266) to building your own app. In the end, this has resulted in as they claim over 11 000 devices ‘made’ by over 10 000 vendors using Tuyas firmware and cloud services.
Unfortunately many devices have already been shipping with the new patched firmware, evident by a PSK ID beginning with 02 in smarthack-psk.log. There is no workaround at this time. Additionally, manufacturers have been silently switching from the ESP82xx based modules to other chipsets, making it impossible to install alternative ESP firmware on these devices.
Seems like the change has been done a while back and i was unaware of this when i bought the bulk of my Astutes. I was always under the impression that i will be ale to reflash them at a later stage.
Edit:
I looked at the local option, but would rather spend the time converting them to Tasmota. Gives me a lot more freedom.
You need a better solder sucker (Beware of imitations!) It should clear the hole so that you can withdraw the lead/pin.
If you can’t bend/cut the pins of the multiple pin SM device you are trying to remove then you are in trouble with a soldering iron.
Many of the original plugs - whitelabeled “local” ones (like the Connex, the BNETA Wifi plug , the Ulta-Link or the Sansui Wifi Smart Plug YSP1 and YSP2) were pretty much Tuya plugs but almost all of them ran on ESP chips.
So I and many others flashed them - especially where the Tuya loophole existed so that you do not even needed to open it.
But yes, quickly afterwards those loopholes were closed AND they started moving to the other chips.
This process is surely not for the fainthearted or impatient people out there.
Spare stuffed up and three tracks came off with the chip. Took another out and stuffed it up completely with a hot air gun. Maybe i am a sucker for punishment, or I don’t accept failure, but got the third chip off beautifully.
@Village_Idiot is correct. You would need a lot of patients to get this chip off. I have three brands of de-soldering wicks here. Two is absolute crap, the third is working like a charm. Gootwick RMA from Japan seems to work the best for me.
If you use a hot air gun (instead of a hot air soldering station) then I found the best is to heat the board from underneath the component you want to remove (much easier if there are no components on the bottom) while gently trying to lift the component you are trying to remove with tweezers. This way, you won’t accidentally blow other components away with the hot air but you do have to be careful not to damage the board with too much heat.
The worst desoldering job I’ve encountered are the LED backlight strips for monitors/TVs.
The PCB is bonded to an aluminium strip presumably for strength. So any heat you apply is sucked up by this. I have seen videos of applying heat with a candle on the back…